@DC6ST You can get the AOM-5024L-HD-R from Reichelt for 3,15€ I use them in the K6ARK Housing with my #QMX for several Month now.
https://www.reichelt.de/de/de/shop/produkt/elektret-kondensator-mikrofonkapsel-285350
@DC6ST You can get the AOM-5024L-HD-R from Reichelt for 3,15€ I use them in the K6ARK Housing with my #QMX for several Month now.
https://www.reichelt.de/de/de/shop/produkt/elektret-kondensator-mikrofonkapsel-285350

#SSB on the #QRPLabs #QMX+ 5W HF transceiver is just so unnecessarily painful. The built-in microphone doesn't work. Standard microphones don't work.
The very specific microphone capsule required goes for 21 € inc. shipping from Digikey. A finished microphone assembly by G7UFO is 41,85 € inc. shipping. The whole QMX+ kit is only 125 USD, on comparison.
I have revision 4 of the PCB. Really would have expected it to have been fixed to take any microphone by now, or come with the microphone.
Je suis très content que mon couvercle du transceiver QMX fasse son bout de chemin sur internet.
Je l'avais mis en 2024 en Creative Commons - Attribution - Non-Commercial license.
Et franchement c'est vraiment super cool de voir le projet évoluer et s'améliorer au fur et à mesure des partages vidéos sur YouTube tout autour du monde.
QMX cover and desk stand for hamradio POTA SOTA by F4EGX
https://www.thingiverse.com/thing:6599009
#hamradio #QMX labs #qrp

My FT-891 has been retired from POTA service … why?
Following high level, wide-ranging, bilateral talks with senior management (XYL) a far-reaching, binding agreement was today handed down to me. The focus of the agreement is contained in the executive summary which reads: “ya got enough radios already”.
And it’s true
I own more radios than I really use. Nearly all of my radios are of the vintage variety. The sole exception is my QRP Labs QMX. The QMX is unique in that it is an SDR radio so it can be updated as needed. One day, perhaps, even the hardware will become obsolete although it is more likely to succumb to the fragility of its low-cost construction – or the indelicate treatment to which it is subjected in the rigorous outdoor environment where I like to operate.
Radios become obsolete quite quickly as technologies evolve. Many modern rigs incorporate what I like to call a “fish finder” – a waterfall display enabling an operator to “catch” another station with a simple tap on a touchscreen. Fantastic yes, but is it just “nice to have” or an essential convenience for modern operating?
Most of my own outdoor operations are related to POTA. Once out in the Big Blue Sky Shack, preferably far from the madding crowd, in a location accessible only via Shanks’ Pony (an old Scottish expression – “shanks” are legs), I set up my station, find an open frequency, call CQ and work the hunters until they quit coming. What level of technological sophistication does that require? Even a very basic, unsophisticated, boat anchor rig can accomplish that. Does it really require a “fish finder”? Well, a fish finder would be nice, but spinning the dial and listening up for active stations worked for many years. Wanna go high tech? Check the clusters on a mobile phone.
Technological advances can even be detrimental. Remember old tube rigs? They were robust (until the tubes needed replacing). Tube rig operators never had to obsess about SWR. High SWR in a modern radio can result in voltage peaks that can send delicate FET PA transistors to the semiconductor cemetery. Sure tubes (or “thermionic valves” as they are known in the Land of Hope and Glory) can be big and fragile. I remember, when I was a kid exploring the thrill of electromagnetrickery, I owned a receiver with tiny, wire-ended tubes. But this isn’t a post about boat anchor technology – no matter how our romanticized recollections of youth bring out fond memories of days gone by.
Back to the future
I bought my Yaesu FT-891 a few short years ago based on recommendations I read online. I wanted a radio that would pack a punch and make getting QSOs from a campsite almost a sure thing. I remember self-spotting on the POTA website with the comment “100 watts!”. I wanted to attract hunters who wouldn’t have to struggle to hear me. A hundred watts for a CW signal is equivalent to AM broadcast signal strength compared to SSB. Alright, I exaggerate, but it quickly occurred to me that a QRP CW signal into an efficient antenna would get the job done equally well. Since that time I have rarely strayed from QRP – or sometimes QROp (20 watts for a 1 S-unit signal boost) when conditions are bad.
The new shack star – Yaesu FT-891The Yaesu FT-891 is an interesting radio. It’s compact format makes it easy to carry into the field, but also has a downside. Small radios bury most of their impressive set of features in layers of menus. And the FT-891 has an impressive set of features. Audio bandwidth can be set as wide as the mighty Mississippi or as tight as Scrooge’s purse strings. Zero beating the other station’s frequency can be accomplished in a single button press if the “ZIN” function is programmed to one of the A, B, C buttons on the front panel. Then pressing the <F> key repeatedly brings up another four layers of menus. These menus allow the operator to select and adjust other levels of IF filtering like “APF – Audio Peak Filter”, “CNT – Contour”, “SFT – IF shift”, “IPO – Intercept Point Optimization” and “NCH – Notch”.
Filters can get you into trouble
During one POTA activation I recall hearing a hunter respond to me, but his signal sounded like a series of atmospheric clicks. “What the heck is that?” I remember thinking. “Is he testing whether I can copy railroad code?” (I can’t). I set my RIT (Receiver Incremental Tuning) a little off frequency and suddenly his signal was perfectly clear. The problem was my filter was set too narrow. Responding to an activator a little away from zero beat is a technique often used to stand out in a pile-up; it works in SSB too. Since my filter was too narrow the hunter’s signal was just outside my passband. Some CW operators are able to use the filter between their ears to separate a signal in a busy band. It takes some concentration – more than I have.
Tis a gift to be simple
All those menus are such fun to play with while working a pile-up out in the back country with mosquitoes, deer flies and other winged pestilences trying to have lunch on the back of your neck. As you swing an arm wildly to crush the airborne assault your CW key crashes to the forest floor and the contacts fill with wet sand and soil turning dits and dahs into incomprehensible gibberish. The hunters have fled and you are back to sending CQ trying to entice them to return. Wouldn’t it be nice to have a simple radio instead?
It get’s worse
It’s fine and dandy reducing a QRO rig’s power to peanut level. On the FT-891 it’s a simple matter of holding the <F> key down for 2 seconds, rotating the Multifunction knob to select section 16 of the Mariana Trench level menus, then choosing which of the six HF power sub-menus to adjust. Then click the Multifunction knob again, rotate it to the desired power output, from 5 watts to 100 watts; click the <F> key again and in no time at all you’re all set.
But there’s still a problem. The FT-891, like many other QRO radios adjusted for low power, still sucks power out of your battery like a camel filling its hump before a trek across the desert. The FT-891 draws over 5 amps even when the output power is wound down to 5 watts. By contrast, the QMX and other QRP radios can run when powered by a tiny 9 volt alkaline battery.
Big eyes, small wallet
Twenty years ago I worked for a few months in a Toronto establishment known to local hams as “the candy store”. Every day I had every one of the big Japanese manufacturers radios to play with. The staff were encouraged to become familiar with all the radios on display so that we could offer expert advice to customers. My big wide eyes fell on one particular radio from Yaesu; it was the FT-897 – a radio that I began to covet but couldn’t afford to buy at that time. I left that employment to start my own business and after a while I had the funds to buy that rig.
FT-897 Old faithful, now assigned to occasional portable useThe Yaesu FT-897 is a big and chunky, yet rugged looking QRO radio that was intended for use in the field. I used it as a base station radio instead and it served that purpose until quite recently. It is old-tech now but maybe that’s a bit of an advantage. You see, it is relatively simple compared to the later FT-891. The FT-897 was introduced before IF filtering was widely available to the low budget ham market. Instead it has audio frequency filtering – accessible from the front panel – that works remarkably well. I can narrow the CW receive bandwidth down to 60Hz (danger of missing calls), 120Hz or 240Hz very easily without diving deep into a menu system.
The FT-897 does not integrate very well with common programs like FLrig and FLdigi. Too few functions can be controlled with CAT commands – unlike the newer FT-891. So the momentous decision was made to switch the two radios. Who cares if it takes a lot of clicks, twiddles and turns to select a desired feature on the FT-891 if the clicks, twiddles and turns are replaced with on-screen slider controls? The FT-891 is now my shack radio and I am very happy with it in this role. My XYL is equally happy that we don’t have to have another full and frank discussion about my urge to deplete our retirement savings to buy yet another whizz-bang box of tricks that will only keep me happy until the next whizz-bang box appears.
And the old FT-897? Is that going to be my regular portable rig now? Sorry old fella, you’re still a little hungry on battery amps. Maybe field day, perhaps.
Help support HamRadioOutsidetheBox
No “tip-jar”, “buy me a coffee”, Patreon, or Amazon links here. I enjoy my hobby and I enjoy writing about it. If you would like to support this blog please follow/subscribe using the link at the bottom of my home page, or like, comment (links at the bottom of each post), repost or share links to my posts on social media. If you would like to email me directly you will find my email address on my QRZ.com page. Thank you!
The following copyright notice applies to all content on this blog.
This work is licensed under a Creative Commons Attribution-NonCommercial-NoDerivatives 4.0 International License.


@geobomatic @NuclearSquid Plutôt que de faire un clavier à 4 rangées qui serait trop proche des classiques existants, je pousse l’idée de faire un clavier ultra-simple :
– quasiment ortholinéaire
– TOUTES les touches alphanumériques ISO en accès direct (donc 7 colonnes sous la main droite)
– un seul layer pour les flèches, le pavé numérique, les touches F1‑12, etc.
– monobloc splittable
… bref, un successeur au #TypeMatrix, polyvalent gaming et dactylographie.
3/3
On est vraiment désolé pour ce retard, et on espère qu’il ne vous impactera pas trop.
Si on avait fait ça professionnellement, ça aurait été bouclé fin décembre plutôt que mi-janvier. Mais voilà, nous sommes des amateurs qui bossons bénévolement sur notre temps libre, et notre électronicien (@NuclearSquid) avait bêtement des partiels à réviser et à valider… On a donc fait le choix de lui foutre la paix, et d’attendre la fin de ses examens pour l’embêter. Il a consacré un temps complètement fou sur le projet (sans parler d’#Ergol !), et on fait en sorte qu’il ne parte pas en burn-out.
Les protos nécessaires à la mise au point ont un coût, mais la générosité des Ergonautes qui ont passé commande nous permet de l’absorber. Le plus important à nos yeux, c’est qu’on ait une base électronique solide, non seulement pour ce #QuackenFlex en cours, mais aussi pour le projet #QuackMatrix / #QMx qui est dans nos cartons.
KD5ZZU’s very elegant build of “Old Barebones” – a Z-match tuner
Back in October 2024 I wrote a post with the title “Old Barebones” – A QRP Z-match Builder Project. The project’s purpose was to construct a simplified version of the Norcal Z-match tuner (which I also owned) to use with my QRP Labs QMX transceiver. The Norcal tuner included some features that I simply did not need – such as balanced transmission line terminals, a simple LED SWR indicator and three switches (Balanced line/BNC, Tune/Operate, High/Low impedance). The schematic was copied from the Norcal tuner – a superb design that I didn’t think I could improve. The end result was a very simple device with three BNC connectors, a toroidal inductor and two polyvaricons, all packaged in a small Amazonian plastic enclosure. Alright, it is an ugly device mainly due to the inelegant knobs I chose to use. But it works very well indeed and has become my main QRP portable antenna matching unit. Heck, it cost me a big fat nothing to build thanks to my extensive junque box stocked from years spent hoarding miscellaneous bits and pieces. When I have finished twiddling the knobs I can always put my hat over it to hide its lack of elegance.
Then, out of the blue, I received an email from Mallory KD5ZZU who expressed an interest in building her own version of “Old Barebones”. Mallory queried whether the design would work on the high bands. I had only tested mine on 20m, 30m and 40m, so I hooked it up to my home 80m EFHW and my portable 13ft tripod vertical antennas to test whether a low SWR could be achieved with Old Barebones on 17m, 15m 12m and 10m. Fortunately Old Barebones did a splendid job on both antennas so Mallory took the plunge and built her own version.
Note: My 80m EFHW (End-Fed Half Wave) is used primarily on 80m but is also useful on 40m and 20m. Using a tuner to obtain a low SWR on the higher bands protects the radio from high SWR but does not imply that the antenna is useful on those bands.
Mallory experienced a hitch in the construction though. Her first build did not function as expected and she asked for ideas on what to look for to resolve the problem. It turned out to be the connections to the polyvaricons that were the problem. Polyvaricons often have several sets of vanes and multiple connection points. I had used a capacitance meter to identify the correct connections in my original build. Realizing this may be the problem, Mallory quickly identified the correct connections and got her tuner working. She wrote that she was able to achieve a nice low SWR on all bands from 20m to 10m with her 71ft EFRW and 9:1 unun. A great result.
But Mallory doesn’t need to cover her version of Old Barebones with a hat to disguise its appearance. It is a beautiful design built into a custom 3D printed case with 3D printed knobs and looks terrific.
If anyone else is interested in building this simple construction project Mallory has kindly provided links to an online source for the parts and the 3D print files:
Here is a link to the 3D print design of the knobs: https://www.thingiverse.com/thing:3035549/files
Here is a link to the file to 3D print; it’s a print profile (modification) from the original designer of a customizable enclosure box: https://makerworld.com/en/models/2002942-custom-enclosure-box#profileId-2400746
A note on the use of Old Barebones
I designed Old Barebones for use with my QRP Labs QMX transceiver which has a convenient “Tune SWR” feature that reduces the output power to 25% to reduce the stress of high SWR on its delicate finals during the tuning process. I have also used Old Barebones with my Yaesu FT-817 but I manually reduce the power to 1 watt or less during tuning. If using Old Barebones with any radio that does not have an SWR indicator I recommend incorporating an SWR indicator in the tuner circuit similar to the original Norcal BLT design.
Polyvaricons?
The word “polyvaricon” is presumably a contraction of “Polymer Variable Condenser” meaning a plastic enclosed variable capacitor using a plastic dielectric. It is believed to be the trademark of a Japanese company that manufactures these devices. But shouldn’t it be called a “polyvaricap”. I remember back in the dawn of my existence that capacitors were called “condensors” but that term disappeared a long time ago. Strange old world.
What is a Z-match?
“Antenna tuners” are often named after their topology. For example, an L-match comprises a series inductor or capacitor and a complementary parallel capacitor or inductor. The combination of inductor and capacitor forms an “L” shape. However, there is no immediately apparent “Z” shape to the components in a Z-match, so I presume the “Z” refers to impedance. Let me know in the comments if I am wrong.
Pros and Cons of the Z-match
From the GQRP organization in the UK:
Advantages of the Z-Match
Disadvantages of the Z-Match
Thanks again to Mallory KD5ZZU for sharing her build with Ham Radio Outside the Box and congratulations Mallory for turning my original inelegant build into something with class!
Help support HamRadioOutsidetheBox
No “tip-jar”, “buy me a coffee”, Patreon, or Amazon links here. I enjoy my hobby and I enjoy writing about it. If you would like to support this blog please follow/subscribe using the link at the bottom of my home page, or like, comment (links at the bottom of each post), repost or share links to my posts on social media. If you would like to email me directly you will find my email address on my QRZ.com page. Thank you!
The following copyright notice applies to all content on this blog.
This work is licensed under a Creative Commons Attribution-NonCommercial-NoDerivatives 4.0 International License.


The ultimate rebuild of an ancient Yaesu FT-817.
I think it was a couple of years ago now I ordered a QRP Labs QMX transceiver. It quickly, but temporarily, became my favorite radio for portable field operations. I have written before about why I believe the QMX is a mighty fine piece of miniaturized technology but is less suitable for the rigors of being operated in the kind of field operating environment to which I expose my radios. My QMX is the low-band version and I also miss the opportunity to explore the higher bands when propagation conditions permit.
What’s a poor Ham to do?
I could buy another QMX, but order the high band version this time. It would be a very modest investment, but would still require ruggedizing. Another downside is the long, long wait time betwixt ordering and receiving the tiny parcel from Turkey. I could also order a QMX+ which is a fine all HF band radio, but then what to do with the QMX low band? There is another solution.
The Paranoid Android
I recall a quote from the book “The Hitchhikers Guide to the Galaxy” by Douglas Adams in which the perenially depressed robot “Marvin the Paranoid Android” moans: “The first ten million years were the worst.” When I look at the front panel of my ancient Yaesu FT-817 non-ND version it kinda has a Marvin look about it. It has spent almost a quarter of a century waiting patiently in a drawer for the day when it might be called into action again. Many radios have come and gone during that time but – even though I had planned to sell it on many occasions – I still own it and it’s day to see the sunshine again has finally come.
Where are the features?
The non-ND version of the FT-817 is a barebones rig. I needed a CW memory keyer – it doesn’t have one. Activating a POTA park sometimes requires great patience and many, many CQs. My QMX at least has that covered. I also needed an audio filter. It used to be possible to buy a Collins mechanical filter but they are no longer made. My QMX also has that feature covered, but the FT-817 requires an external audio filter.
Failure is not an option
The FT-817 does have a higher level of ruggedness than the QMX. With a few extra precautionary measures it can be protected from the ingress of sand particles during a beach activation, or unexpected spray from waves on the shores of the Great Lakes. The QMX will not tolerate wide variations in DC supply voltage; the FT-817 has that covered. The QMX uses inexpensive but fragile PA transistors (mine have not succumbed to failure – yet). Well, the FT-817 also had fragile PA transistors in its early days and mine did indeed fail during a field deployment. The FT-817’s PA board is a small module that is easily replaced with the new upgraded module – as was mine.
Assembled rebuilt FT-817 portable operations rig. The battered, field protective canvas pouch on the right contains a Talentcell LiFePO4 battery. Right hand side view of the “helper modules” showing the input jack for connecting a cable from the headphone output of the FT-817. The switch allows the K4ICY AF filter to be bypassed for a barn door wide audio bandwidth. Left hand side view of the “helper modules” showing the switch allowing selection of 2-stage or 4-stage audio frequency filtering. To the right of the switch is the AF output jack for connecting headphones. The jack on the K3NG keyer connects to the “Key” jack on the FT-817. On the back of the AF filter module is the power switch controlling the internalI get by with a little help from my friends
The feature shortcomings of the FT-817 have been overcome with two “helper modules” assembled inside aluminum Hammond project enclosures. The front enclosure contains a K3NG Arduino nano based CW keyer and a very simple no-thrills set of 3D printed paddles. Well who really needs to spend $300 on a fancy set of paddles for a brief POTA exchange? These paddles get the job done FB. The same cannot be said about the fist that operates them!
The front panel controls are very simple. The paddles protrude through a cutout in the Hammond enclosure.
Beside the paddles is a knob. This knob is used to operate a rotary encoder inside. Clicking the knob operates the switch built into the rotary encoder and triggers the sending of a “CQ CQ POTA de VA3KOT VA3KOT k” stored message in the Arduino keyer.
Rotating the knob adjusts the speed of the CW over a wide range. I have found this to be a very useful feature. I usually send at 20wpm and receive responses that are slower and faster than my sending speed. With this prominent control front-and-center I can quickly adjust my sending speed to suit.
I built the K4ICY audio frequency filter module around a quad op-amp DIL chip. This is a very simple circuit that provides 2 or 4 stages of filtering to narrow the bandwidth of a received signal. Each stage contains identical components whose values are selected according the operator’s desired sidetone frequency. The whole module can be bypassed if required allowing an audio bandwidth wide enough to pass a crosstown bus sideways.
Both modules are rigidly secured to each other using two aluminum rails made from scrap material. I hoard scraps of metal, plastic and other materials – you just never know when you’re gonna need ’em.
The dimensions of the two modules provide an ample flat surface on which to mount the ancient, but revered, transceiver. I purchased some “peel & stick” Gorilla brand “Slipstick” gripper pads and applied four of them to the base of the FT-817. This is a genuinely useful product I recommend to any hambrewer. The radio has been secured to the top of the helper modules with two woodland zip ties made from thin cordage. These simple cord fasteners work just as well as plastic zip ties and can be easily undone for servicing the modules.
I purchased a box load of these Hammond enclosures at an auction many years ago. They have proved very useful. In another build, using the same enclosures configured in an identical manner, I was able to construct two battery modules each containing four 18650 Lithium Ion batteries in 4S1P configuration for powering another one of my ancient QRP transceivers.
This is not the first time I have revived my FT-817, but previous rebuilds were clumsy. It is one thing to put together multiple modules on the shack bench. Clumsy, cluttered, loose modules might work in a picnic-tables-on-the-air type activation. But would it work in a situation where there are no convenient surfaces to mount the equipment; where – at any moment – we might be politely asked to vacate the area by a hungry bear looking for a space to eat his lunch? This new build is a grab-and-go package that works in small, tight spaces – even on top of a rock in the backcountry – and that’s the kind of environment where I like to operate.
Help support HamRadioOutsidetheBox
No “tip-jar”, “buy me a coffee”, Patreon, or Amazon links here. I enjoy my hobby and I enjoy writing about it. If you would like to support this blog please follow/subscribe using the link at the bottom of my home page, or like, comment (links at the bottom of each post), repost or share links to my posts on social media. If you would like to email me directly you will find my email address on my QRZ.com page. Thank you!
The following copyright notice applies to all content on this blog.
This work is licensed under a Creative Commons Attribution-NonCommercial-NoDerivatives 4.0 International License.


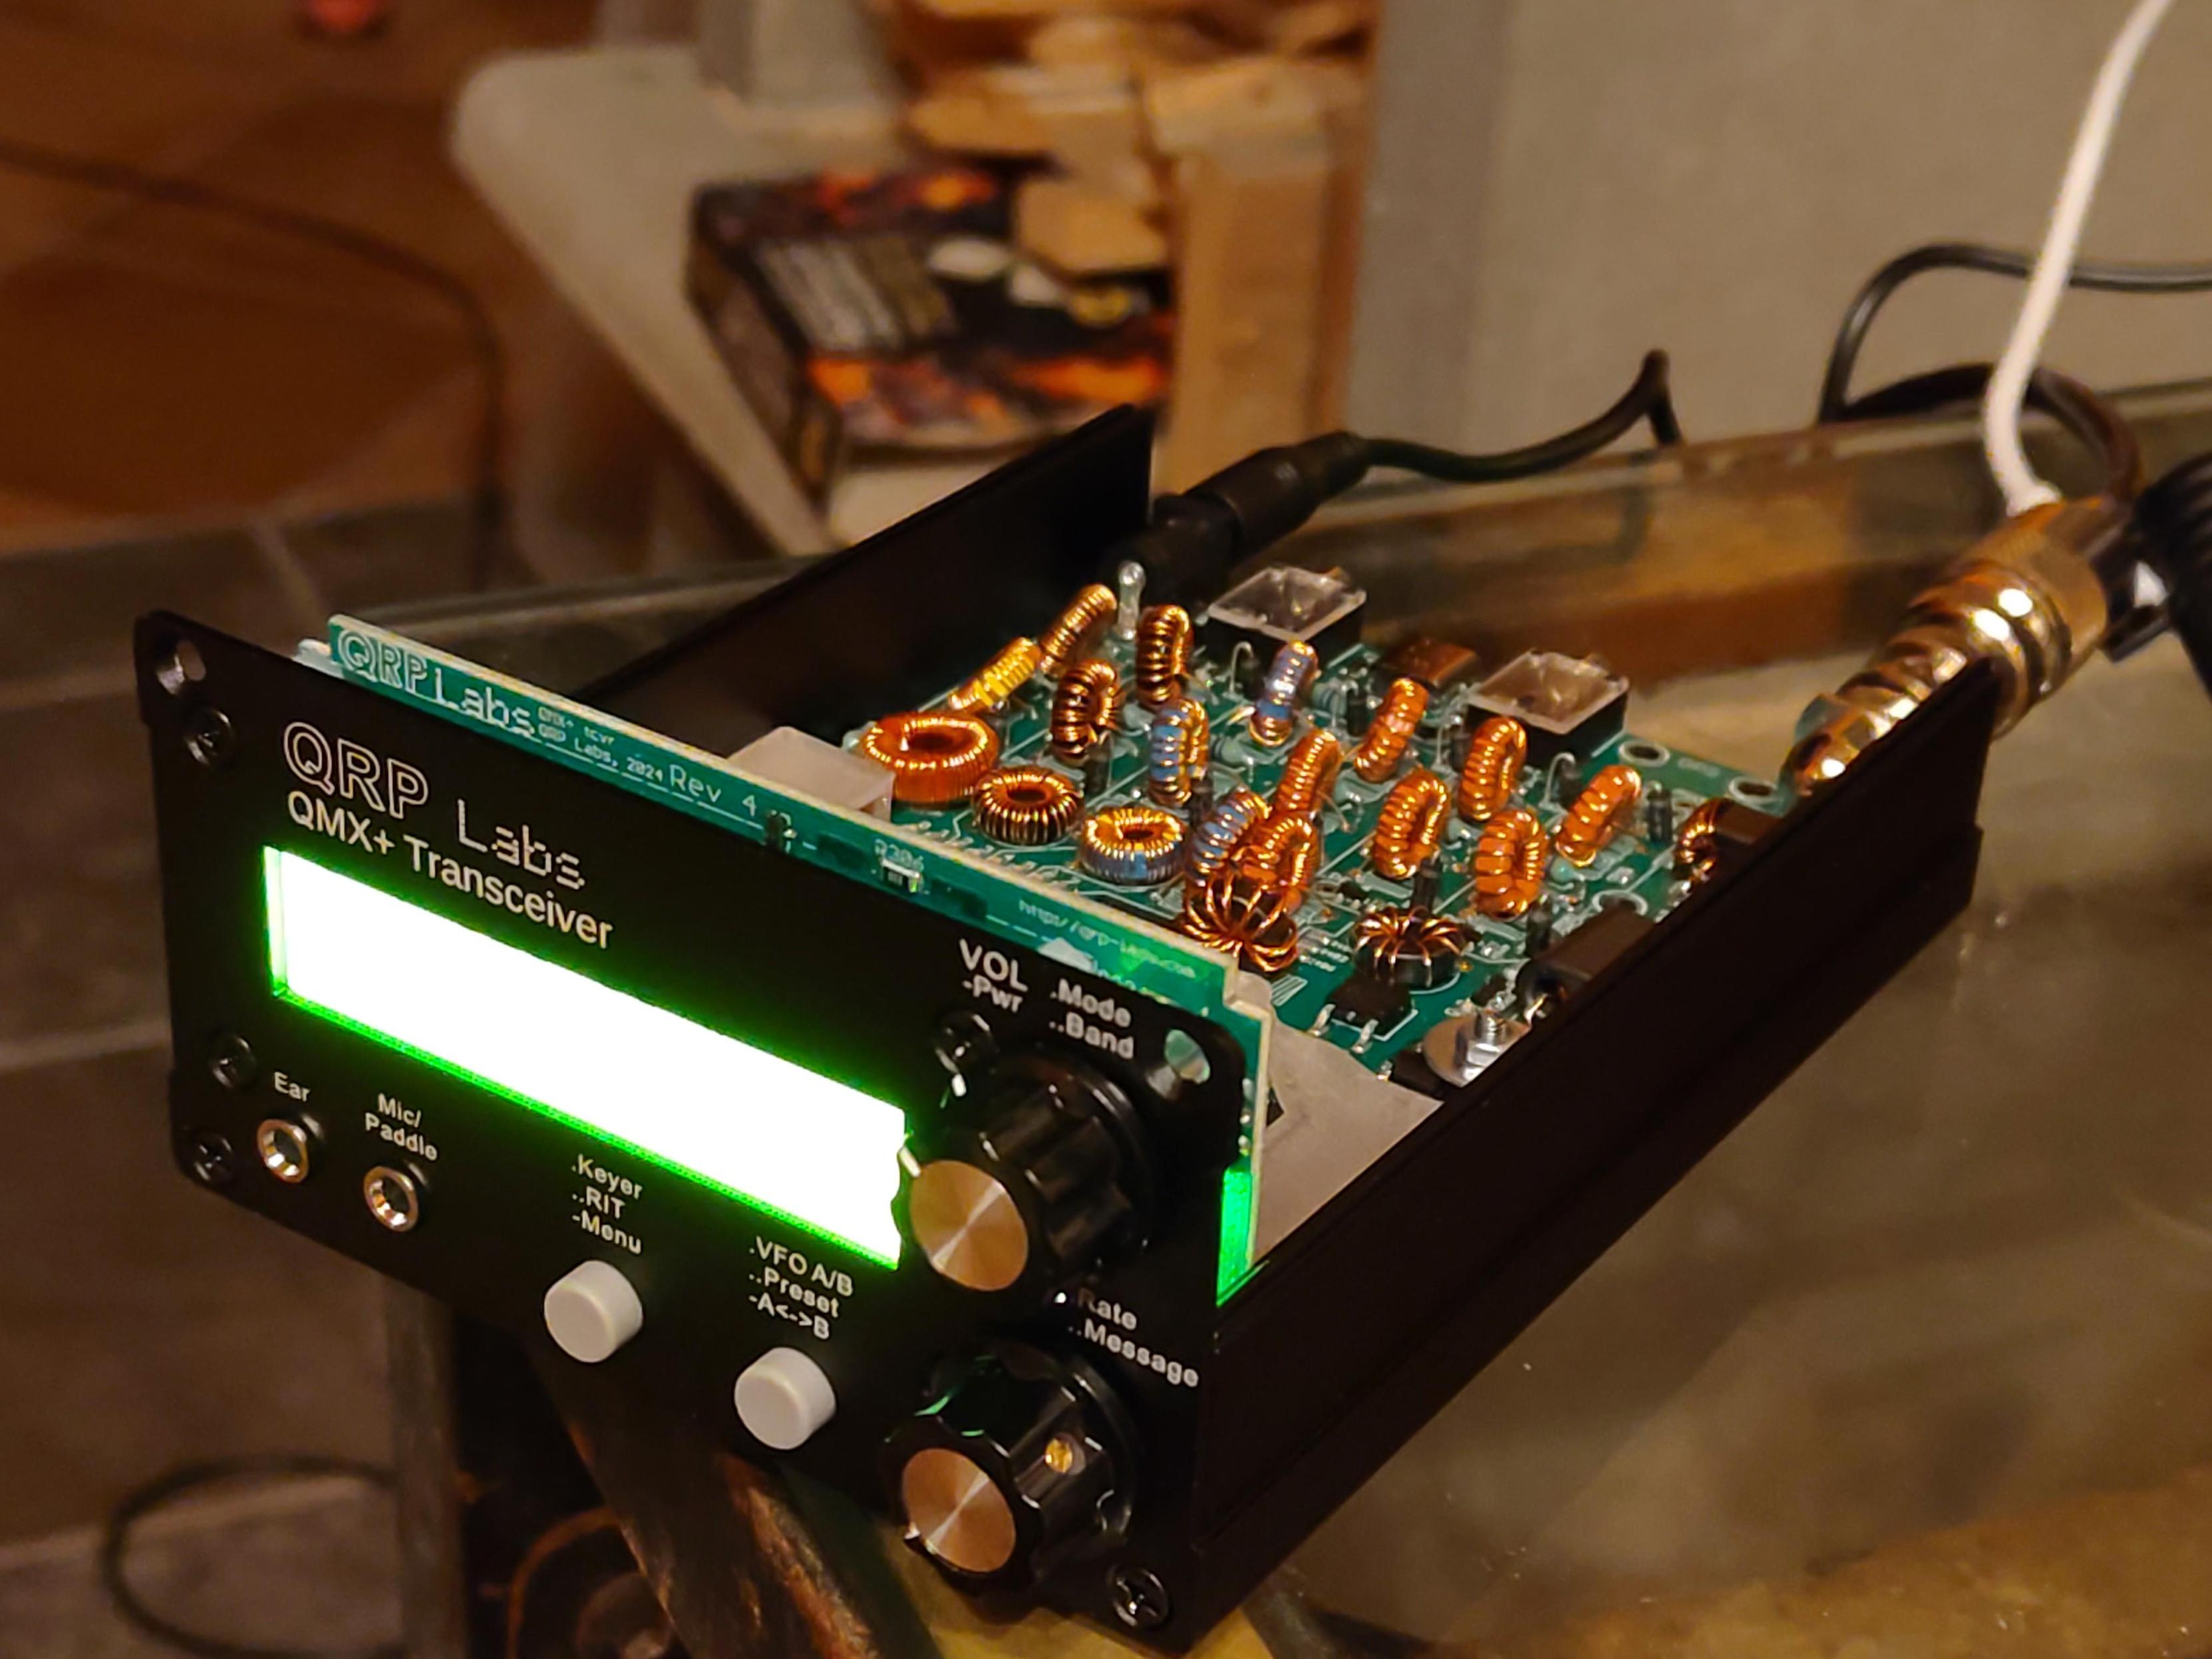
Step 1 on the #qrp_labs #qmx+ done! All 12 diodes in place. Since last post I've bought some snips which have let me solve the problem of the #solder coming too high off the board and bridging to the metal case. I've also bought a desoldering pump which is extremely useful! There were some very close proximity pads, but nothing has shorted electrically that couldn't be removed and redone. Happy so far... but #toroids next (I think)... eek! #circuit #electronics #amateur_radio #ham_radio

Friday afternoon #wwff #fieldradio #cw #morsecode #qrp and #coffee with the @qrplabs #qmx #packtenna #efhw brewing and drinking #coffee from my #grayl hiking water purifier kit.


I've just started the #QRP_labs #qmx+ transceiver kit. I've not done all that much soldering before so this is a big challenge for me, but this is the first three diodes in with no shorts or dry joints as far as I can see. I'm starting to feel like I have better control over the iron and my technique has improved on each of the diodes thus far. I'll keep updating this with the progress!

Post 004: Finding My Frequency
Every ham remembers their first official contact. For me, it was the man who “pestered” me into the hobby: my husband. Being able to log him as my first-ever contact was a moment of immense pride. I got into this to share a hobby with him, and suddenly, we were finally on the air together.
With that first log entry, the floodgates opened.....
#HamRadio #POTA #CW #QRP #QRPLabs #QMX #ArkansasHams #ParksOnTheAir

Took a long lunch break from work to activate the SOTA summit of Ruardean Hill today. It’s an easy drive-up and the weather was pleasant.
First time out for the QMX @n6ara paddle combo. Sending improved a bit once I realised I needed to tweak the spacing - sorry chasers!
Still early days for me with the QMX but I’m really liking it. It’s a fab radio. Even better once you factor in the VFM.
#SOTA #QRPLabs #QMX #UVK5 #N6ARAElectronics #AmateurRadio #HamRadio


I went out to US-10658 to run the repaired @qrplabs #QMX mid-band with a ground wire from the @elecraft T1 ATU and a @packtenna #EFRW with a 20' counterpoise, I had NO #RFI issues when holding my #BamaKey TP-III. I got great signal reports even though the conditions were "fair".


I am irrationally entertained by the GPS status screen in the terminal interface of my #QRPLabs #QMX+ radio.

POTA PERformer radials – can we make a compromise?
There has only been one light snowfall in southern Ontario so far this season – just a few centimeters that melted away within a couple of days. In anticipation of upcoming heavier snowfalls and a semi-permanent white blanket that will last until spring, I bravely shrugged off the chilly outside air and set up my Ham Radio Outside the Box version of the POTA PERformer antenna out in the backyard to experiment with radial lengths.
The cunningly repaired broken shortened whip with a capacitive top hat, to compensate for its inductive reactance on the 20m band, sat atop my custom spike mount that, despite falling temperatures, could still be pushed into the ground about 25cm (10 inches). Two radials were attached each of which sloped down to a fiberglass stake about a foot (30cm) above ground. The radials are approximately 5m (17ft) long for the 20m band with links to shorten the wires for the 17m and 15m bands.
Now, to find a shortcut
The objective for the day’s tests was to investigate whether compromises could be made in the radial lengths. Why? Later in the winter, when the snow lies deep and crisp and even, it can become a real chore to wade through accumulations of the infernal white stuff to adjust the radial lengths for band changes. I have adopted 2mm banana plugs for the links – a great idea in the summer, but maybe I neglected to consider what will happen when even a few snow flakes freeze on those tiny connectors in the winter!
So, how to minimize pedestrian excursions through the challenges of winter operating conditions to accommodate band changes? The POTA PERformer is an efficient antenna but it was designed in California where the climate is just a little milder than in Ontario. Should I go back to using a random wire antenna – like the Rybakov – until spring comes around again?
I could perhaps use “fan radials” i.e. separate radials for each band. That would probably work but setting them up might still involve wading through deep snow. In the past I have used ground radials laid on the snow – a multiband arrangement that requires no adjustment for band changes, but is less efficient.
Back to the backyard tests; what did I find out?
So, is this a result? Maybe not. There is a potential for lost efficiency when the radiating element is shorter than the counterpoise. Let me explain.
Let’s assume we are using a field portable version of the POTA PERformer in which the feedpoint remains quite close to the ground – maybe 1 to 1.5 meters. The two radial wires slope away from the feedpoint to an end point even lower to the ground. Now, if we examine the current distribution on a halfwave dipole, we can see that the maximum current, and therefore the point at which maximum RF is radiated, is located in the center of the dipole.
We would like the high current point to lie within the radiating element, not the counterpoise. For the purposes of this discussion we are going to refer to the two radial wires as “the counterpoise”.
Going back to my backyard tests, I found that:
In each of these cases the radiating element was shorter than the counterpoise.
Referring to the accompanying diagrams we can see that the high current point, in each case, lies within the counterpoise.
Does this finding matter?
Changing the radiating element versus counterpoise balance creates an antenna that looks very much like an Off Center Fed Dipole (OCFD).
If an OCFD is mounted high enough above ground it doesn’t matter at all although two things need to be considered here:
A relatively small change in the ratio between the radiating element versus counterpoise lengths changes the feedpoint impedance, but this can be compensated by adjusting the whip length to still obtain a usable SWR.
However, we cannot compensate for the proximity to ground of the counterpoise in the POTA PERformer. If the current maximum occurs at the feedpoint (1 to 1.5 meters above ground) very little power is lost. But, if the current maximum occurs below the feedpoint we are going to keep the earthworms warm in winter.
Not the best plan
So we can conclude that using a 20m counterpoise on 17m risks losing some of our RF energy to the ground. The same applies for using a 15m counterpoise on 12m and 10m. The following diagram summarizes this.
The way forward
“Fan radials” may still be a solution but they require some careful experimentation. There is interaction between the wires for each band due to mutual capacitance. This is compounded when multiple bands are involved. To make matters worse, when used out in the Big Blue Sky Shack where the wind doth blow through the wires and changes the interaction, who knows what wild swings in SWR may occur? The radio I have dubbed my “very clever poodle” (QMX: see last post) will not take kindly to that.
A final thought
I have watched several videos in which a very short whip is mounted on a picnic table and used with a single long counterpoise wire draped down to and across the ground. Sometimes the “Magic (Tune) Button” assists in finding an SWR that keeps the radio smiling. Contacts get made, so what’s the problem? I hope the above discussion answers that question.
Help support HamRadioOutsidetheBox
No “tip-jar”, “buy me a coffee”, Patreon, or Amazon links here. I enjoy my hobby and I enjoy writing about it. If you would like to support this blog please follow/subscribe using the link at the bottom of my home page, or like, comment (links at the bottom of each post), repost or share links to my posts on social media. If you would like to email me directly you will find my email address on my QRZ.com page. Thank you!
The following copyright notice applies to all content on this blog.
This work is licensed under a Creative Commons Attribution-NonCommercial-NoDerivatives 4.0 International License.
#amateurRadio2 #antennas #counterpoise #ground #outdoorOps #pota #qmx


QRP? Are we out of our minds?
If we believe in QRP – I mean really, really believe – then we can make it work. Admittedly it’s like betting on a race between a tortoise and a hare; where would you put your money? If you read accounts written by diehard QRPers, do you ever see stories such as: “I went to the park with my latest QRP rig today and called CQ for five hours but only got 2 QSOs. On the way home I tossed that stupid rig in the river and bought a big-boy radio instead”? Of course not. Diehards enjoy the outing as much as the contacts. They get a thrill out of tickling the ionosphere even if the big bad D-layer swallows their RF and has a malignant chuckle to itself.
I am not a diehard, but I do like to operate QRP whenever it yields a good probability of actually getting contacts. On the other hand, when propagation conditions are unfavorable, or I cannot erect an efficient antenna, I am willing to switch to warp power to get the job done.
The FCC has given us guidance in the form of the Part 97 rules, and to paraphrase them:
“Use (only) as much power as in necessary to make the contact”
There are different ways to interpret that guidance. For many QRO operators it means “fire up the amp and let ‘er rip; life’s too short …”. The word “only” in the above may occasionally fall on deaf ears. QRPers, on the other hand, might see things differently and ask: “How can we make this work without increasing power?”.
There are days when 5 watts into a tiny coil-loaded whip is all you need; for other days there are tricks that can be employed to make a teeny-weeny smidgen of RF create the illusion of a really big-boy signal. The big secret is that it doesn’t matter how much signal the P.A. of our radios – big, small or tiny – presents at the antenna jack. What really counts is how much signal appears at the receiving end.
A military ELF (Extremely Low Frequency) radio station puts out a huge amount of power, but the amount reaching a submarine somewhere beneath the world’s oceans is only a few watts – effectively QRP. QRO operators can emulate that idea by using a dummy load with a random wire antenna attached. No tuner needed, any old antenna will work and the radio will always see a low SWR. It is said to work just fine but with the caveat that you will lose about 1 S-unit in signal strength due to loss in the dummy load. Would it be possible to invert that situation and transmit a very low power signal that a receiving station would perceive to be more powerful?
Don’t announce your handicap
If we call CQ and identify ourselves as QRP we are telling the world we are transmitting a teeny-weeny smidgen of a signal and that negatively influences the receiving station’s perception. In his book “Winning through intimidation” author Robert Ringer tells of clever benevolent techniques he employed in his sales career to dazzle potential clients into having a glowing perception of him. So let’s not mention our piddling power and allow the receiving station to assume we are just another regular ham station, or maybe even a superstation.
Use an efficient antenna
When conditions are right you can make contacts with a wet noodle. In most cases it makes sense to assume conditions are unfavorable and plan for the worst. That means putting up an efficient antenna – one that converts as much of our feeble signal as possible into radiated RF. If we can put up a gain antenna, even 3dB of gain, we will double our effective radiated power.
Don’t use a vertical antenna
Well, ok if we have to use a vertical antenna it should be raised off the ground. A ground mounted vertical antenna requires a lot of radials to be efficient. If it is raised as little as 1 meter above ground less radials will be required – maybe as few as 2.
A vertical antenna radiates equally in every direction so our feeble signal is spread around 360 degrees. If that signal can be focused to favor a specific direction, the receiving station will perceive it to be stronger. Greg KJ6ER’s POTA PERformer can effectively focus a signal even more than he intended by sloping the radiator away from the direction we wish our signal to go. Modeling with EZNEC shows a front/back ratio of over 8dB can be obtained by this method. That means more of our signal is being directed towards where our target receiving stations are located.
Foxes hunt where the hens can be found
Choosing a band wisely improves the probability of successfully making contacts. If I have Internet access while operating portable, such as when activating a park for POTA, I check 2 things. First, which bands are indicated as having good propagation and, second, which bands have the most activators. If we call CQ on an empty band aren’t we boldy going where no ham has gone before?
Side by side
It can sometimes help if we park ourselves adjacent to another active frequency. I have used this technique myself hoping some of the big station’s hunters will hear my signal while tuning in to the other guy. For CW ops a 500Hz separation should be enough to avoid interfering with the other station; SSB ops will need to leave a bigger space.
It pays to advertise
It helps if people know we are going to be on-the-air. Perhaps we are planning to participate in a scheduled QRP event. During the event other QRP stations are actively seeking QRP stations to work. It is a good idea to post notice of our intention to participate ahead of time in online forums. When planning a QRP POTA activation, we can schedule the activation ahead of time on the POTA website (but don’t mention QRP!). Scheduling gives hunters advance notice of when to look out for us on-air. Some lucky QRP operators may even be on hunters’ Ham Alert lists.
The poodle and the bulldog
My current most used QRP radios include a QRP Labs low-band QMX – a cute little fella, but very fragile. Doesn’t like high SWR or any supply voltage over 12.00 volts. Also not very rugged, but it’s packed with features.
I rebuilt my QMX “Ready to Go” rig yet again. Maybe this time it will get more QSOs!I bought this old steam-powered Yaesu FT-817 from a guy called Fred Flintstone in 2001. Back then Yaesu thought it was a good idea to make customers pay extra for luxuries like a memory keyer and a mechanical filter to narrow the receiver bandwidth. Being (like many hams, it seems) a miser I chose to build my own add-ons to make this great little multiband rig more usable. It has made a lot of QSOs for me. I have revived it after it spent a long time on the shelf. I like to think of this radio as a bulldog while the QMX is a clever little poodle.
My 24 years old Yaesu FT-817 (non-ND) is still chugging along. Supports all bands from 160m to 70cm and it’s not too fussy about its supply voltage, BUT, it needs a little help!The K4ICY 2/4-stage audio filter plugs into the radio’s headphone jack and provides a narrow audio passband. It is based on a single chip quad op-amp. I built it inside a Hammond aluminum box because when in a plastic enclosure it picks up near-field RF and amplifies that too. It is powered by an internal 9V battery.
My build of the K3NG Arduino-based CW memory keyer is equipped with just one control. Turning the rotary encoder adjusts CW keying speed on the fly (a useful feature during a POTA activation). Clicking the rotary encoder knob sends a pre-recorded CQ message. It is powered by a single 18650 LiIon cell with built-in buck boost to bring the voltage up from 3.7 to 5 volts.
My Yaesu FT-817 (non-ND)’s little helpers – my build of a K4ICY audio filter and my build of a K3NG memory keyer.Where, outside the box, do we venture next? Stay tuned, or subscribe. And, if you have any suggestions or questions, please leave a comment below.
Help support HamRadioOutsidetheBox
No “tip-jar”, “buy me a coffee”, Patreon, or Amazon links here. I enjoy my hobby and I enjoy writing about it. If you would like to support this blog please follow/subscribe using the link at the bottom of my home page, or like, comment (links at the bottom of each post), repost or share links to my posts on social media. If you would like to email me directly you will find my email address on my QRZ.com page. Thank you!
The following copyright notice applies to all content on this blog.
This work is licensed under a Creative Commons Attribution-NonCommercial-NoDerivatives 4.0 International License.


First #POTA in a while. Which is a bit of a crime when the lovely Crickley Hill GB-0516 is only 10 mins from work!
Getting used to using the #QMX before commiting to a #SOTA with it. Works great. But either the keyer in the rig or the #BamaTech key has something I need to get used to as I couldn’t send for toffee today! Apologies hunters!
#QRPLabs #AmateurRadio #HamRadio #ParksOnTheAir